
Priya Nandan, Staff Writer.
There is a specific moment, usually around 7:40 on a Tuesday morning, when a woman stands in front of the bathroom mirror pointing a dryer at her roots and wondering why her hair still looks the way it looked before she spent $140 on the thing. The drugstore endcap promised shine. The box said ionic technology reduces frizz. And yet the result depends far less on the dryer sitting in the cabinet than on the six minutes of technique that happen after it gets switched on.
Here is the fact worth knowing before anything else: ionic dryers work by emitting negative ions that break up water droplets on wet hair into a finer mist, which evaporates faster and disrupts the positive charge that causes strands to repel each other into frizz. That is real physics, not marketing language. But the effect only shows up when the dryer is used at the right distance, angle, and speed. Buy nothing. Change how you hold it.
- Distance matters more than wattage: holding the dryer 6 inches from the hair, not 2, lets the ionic effect finish sealing the cuticle before heat scorches it.
- Cold shots lock the style, not the heat: a 10 to 15 second blast of cool air at the end of each section is what actually sets shine, according to cosmetology-school technique standards.
- Rough-drying first saves the ends: hair dried past 80 percent before any brush touches it loses far less moisture stress than hair styled while dripping wet.
Why The Same Dryer Gives Different Results To Different People
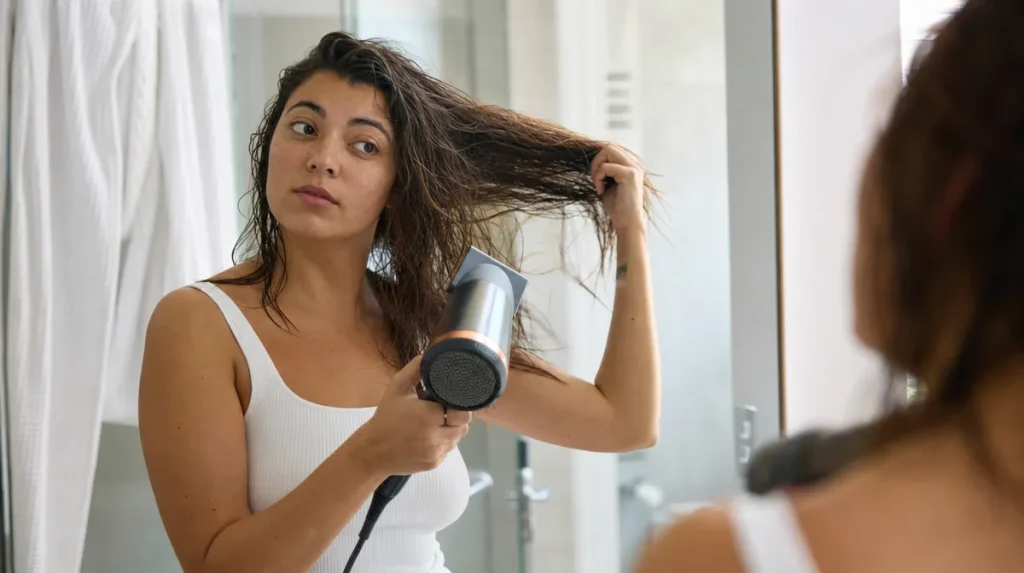
An ionic dryer is closer to a humidity valve than a heat gun. It floods the air stream with negative ions that attach to water molecules on the hair shaft and split them into smaller particles, so they evaporate before they have time to swell the cuticle and rough it up into frizz. Think of a garden hose: a wide-open nozzle drenches everything in big, slow drops, while a fine-mist setting covers the same ground faster and leaves less puddling behind. The ionic dryer is the mist setting.
The catch is that the ion stream only works on hair that is already fairly wet, moving steadily, and not being scorched by a nozzle held too close. Two women can own the identical dryer and get opposite outcomes: one rough-dries at a safe distance and gets a smooth, fast finish, the other holds it an inch from her part for ten minutes and ends up frizzier than when she started, because the heat has outpaced the ionic effect and simply dehydrated the strand.
Finding The Right Distance And Angle
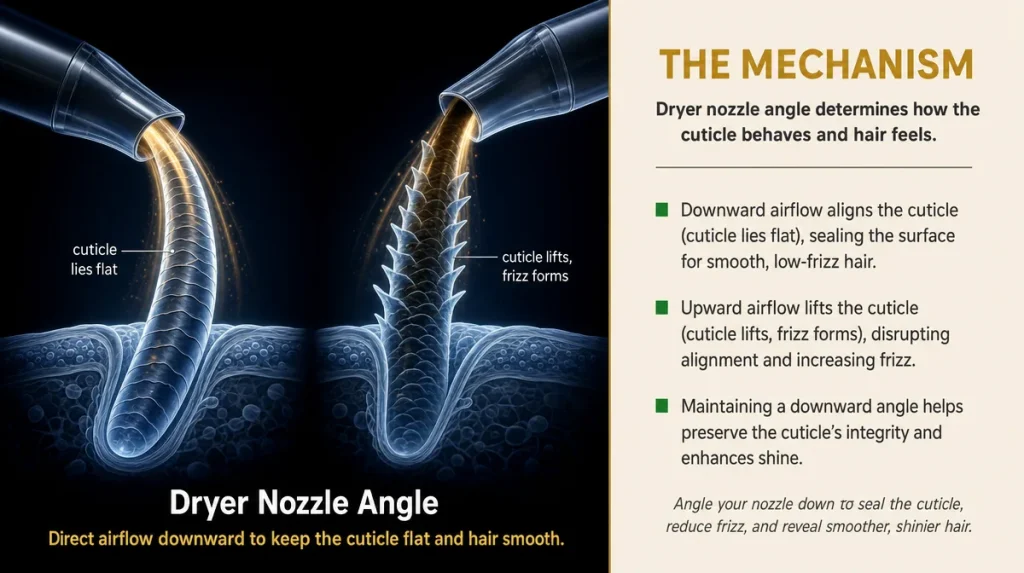
Hold the dryer roughly 6 inches from the hair, angled down the shaft from root to tip rather than straight into the cuticle. Pointing the nozzle down the hair shaft is what smooths the cuticle scales flat, which is where shine actually comes from; pointing it sideways or upward roughs those scales up regardless of how ionic the dryer claims to be.
A quick self-test: take one section, dry it with the nozzle angled down for thirty seconds, then dry a second section with the nozzle angled up for the same time. Run a hand down each. The first should feel noticeably smoother. If it does not, the distance is likely too close and the heat is overwhelming the technique.
Most dryers sold at drugstore counters and at Ulta Beauty or Sephora come with a concentrator nozzle attachment for exactly this reason. Using it, rather than the bare barrel, narrows and directs the airflow so the down-the-shaft angle is easier to hold steady.
Rough-drying Before You Style
The biggest mistake in most bathrooms is picking up a round brush while hair is still dripping. Wet hair is at its most fragile: the hydrogen bonds that give hair its shape are fully broken, and brushing or clamping it under those conditions stretches and stresses the shaft in ways that show up later as breakage and frizz, not immediately as damage you can see.
Rough-drying means running the dryer over towel-dried hair, without a brush, until it reaches about 80 percent dry. At that point the hair has regained enough internal structure to handle tension from a brush or a round barrel without the same risk. It also means the final styling phase, the part with the brush, takes a fraction of the time, because most of the water is already gone.
A reasonable target for a shoulder-length cut is two to three minutes of rough-drying before any tool other than the dryer touches the hair. Fine or thin hair usually needs less; thick or coarse hair often needs more.
Sectioning So The Ionic Effect Can Actually Finish Its Job
Ionic drying works section by section, not all at once. Hair dried in one large mass on the diffuse setting never gets close enough to the nozzle for the ion stream to do much beyond blow air around. Dividing hair into four sections, roughly ear to ear and then down the center part, lets each section get direct, close-range exposure to the airflow for long enough to matter.
Clip the top sections up and start at the nape. This is also simply how the hair dries evenest: the underlayers, which trap the most moisture against the scalp, get addressed first, rather than left half-wet under a dry top layer, which is the classic cause of a blowout that looks finished but goes flat and puffs up an hour later.
The Cold Shot Button Most People Never Touch
Nearly every ionic dryer sold in the past decade has a cool-shot button, usually blue, usually ignored. Heat opens the hair’s outer cuticle layer enough to reshape it; cool air is what closes that layer back down around the new shape. Skipping the cold shot is a bit like taking a cake out of the oven and slicing it immediately: the structure has not had a chance to set, so it collapses under the first touch.
The method: finish styling each section with the dryer on its lowest heat, then hold the cool-shot button for 10 to 15 seconds while the section is still wrapped around a brush or your fingers. Release only after the hair feels cool to the touch, not just cooler. Cosmetology training materials commonly cite this as the step that determines whether a blowout holds through a humid subway platform or falls within the hour.
Reading Humidity Before You Even Turn The Dryer On
Ionic technology fights frizz caused by static and by the hair shaft absorbing ambient moisture unevenly, but it cannot fully cancel out a genuinely humid room. A bathroom fogged up from a hot shower is fighting the dryer the entire time. Cracking a window, running the exhaust fan, or simply waiting two or three minutes for the steam to clear before starting meaningfully improves the ionic effect, because the dryer is no longer competing against ambient water vapor settling back onto the hair as fast as it dries it off.
This matters differently depending on the season. A humid East Coast summer morning is a harder starting point than a dry winter day with the heat running, when indoor air often has less moisture than the hair itself, and the same technique will visibly outperform on the dry day. Adjusting expectations, not blaming the dryer, is the honest read on a bad-hair-day August morning.
What The Ionic Label Is Not Doing
It is worth separating the marketing claim from the mechanism. “Ionic” describes a real feature: a small internal component generates negative ions that interact with water on the hair. It does not mean the dryer adds moisture, repairs damage, or makes heat safe at close range. A 2021 study in the Journal of Cosmetic Science measured reduced surface frizz and faster drying times on ionic settings compared to standard airflow, but the same study noted the benefit narrowed considerably when the dryer was held too close or used at maximum heat for extended periods, since heat damage can outpace any ion-driven smoothing.
In practice this means a mid-priced ionic dryer used with correct distance, sectioning, and a cold shot will often outperform a premium one used carelessly. The Good Housekeeping Institute’s general guidance on heat styling tools points in the same direction: technique and heat settings affect hair health more than the tool’s price point.
Key Takeaways
The physics behind an ionic dryer only pays off when the technique matches it. Keep the nozzle about 6 inches away and angled down the hair shaft, rough-dry before any brush touches the hair, section the hair into four so each part gets real airflow time, and finish every section with a genuine cold shot rather than skipping straight to the next one. None of this requires a new purchase. It requires roughly the same six minutes, spent differently.
A Quick Checklist For Your Next Blowout
- Clear the steam from the room before starting
- Towel-dry, then rough-dry to about 80 percent with no brush
- Section hair into four, starting at the nape
- Hold the dryer 6 inches away, angled down the shaft
- Use the concentrator nozzle attachment if the dryer came with one
- Finish each section with a 10 to 15 second cold shot
- Judge results once hair is fully cool, not while still warm
This article is for general information and does not replace advice from a licensed stylist or dermatologist.
Individual results vary depending on hair type, texture, and existing condition.